
Microsoft Excel is the GOTO tool for data management and data processing. MS-Excel provides powerful tools to filter large data sets and visualize data in a very efficient and appealing way. It is the Industry standard tool that is used to record expenditures and income, plan budgets, chart data, and succinctly present fiscal results.
If you are a beginner in the world of MS-Excel or just started to figure out how it works, we recommend you go through this quick guide on the General Settings and Formulas which this spreadsheet package offers.
General Settings
To open the general settings of MS-Excel:
- In Excel-2007 click on Microsoft Office Button
, and then click Excel Options.
- In later and recent versions of Excel, Click the File tab > Options.

In the recent versions of Excel, Microsoft have provided more options to customize your workbook according to your preference.
Changing the number of sheets
Once you have clicked on file tab and moved on to options. The dialog box with Excel options will appear.
Here you can select a lot of default options for your workbook when you start a new workbook.
Under the section “when creating new workbooks” just specify the desired number of sheets you want to include in a new workbook.
By default, Excel includes 3 sheets which can be way too more for a student or an individual. But, maybe for a power user or a team, it could be way too less. It depends according to your work.
Changing default font style and font size
The default selected font style is still good. But if you want to completely personalize your workbook you can change the default font style as well as the font size according to your preference.
Under the section “when creating new workbooks” just specify the default font style and size you want to include in a new workbook.
Selecting Default Views for your workbook
Under the same section “when creating new workbooks” you can specify MS-Excel to open in a particular view to help you in your workflow.
You can select from Normal, Page Break and Page Layout View.
- Normal View: Presents you the default excel view without any page break indicators. Just the plain old cells.
- Page Break View: Highlights the Start and end of a page by showing dashed and solid lines for automatic page breaks and manual page breaks respectively.
- Page layout View: Gives you an idea of how your page adjusts to the page size you have selected. So that you could have an idea of how your workbook will look after printing.
Personalize your copy of Microsoft Office
This section is just concerned with the look and feel of the Microsoft office tools you are working on.
This section helps you to choose office themes which can change the color scheme of office applications. It includes Light, Colorful and Dark themes for working in different environments. One can also change the background of their workbooks if it is required by changing the Office Background option.
Beware: Changing theme settings apply throughout the office suite. If you change the theme for Microsoft Excel other tools like Word and PowerPoint also may get affected with the newly applied themes.
You can also set your default username to be used across the MS-Office Suite.
Advanced Settings
We will not go in-depth to the advanced settings. But we will include some of the common advanced settings which a beginner should know in order to understand and customize MS-Excel according to one’s preference.
Changing the Action of Enter Button
Depending on your particular workflow you may want to insert the data in the row cells first.
But the default behaviour of the enter key is that it goes in downwards direction, changing the row. This may be frustrating as you may want to insert the data on the cells which are right to the current cells.
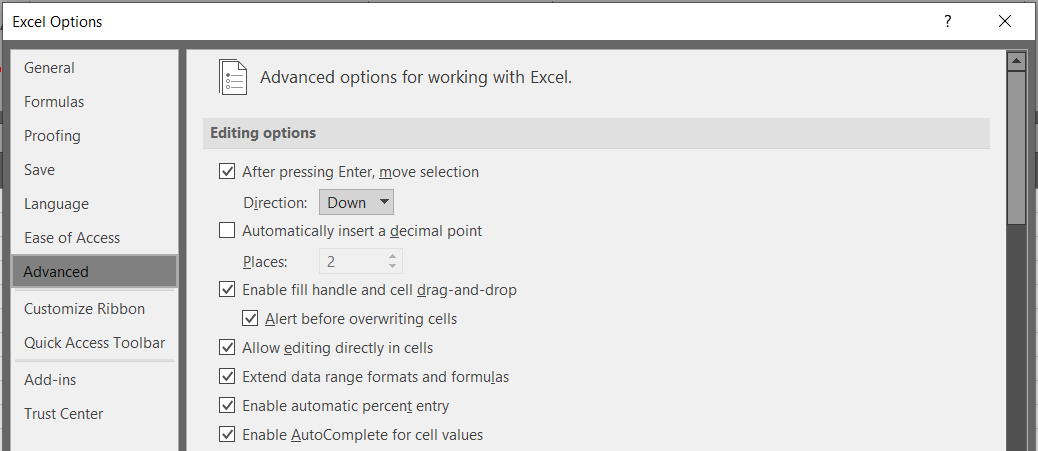
To change the behaviour of enter key just go to the Advanced Tab in Excel Options dialog which we opened earlier.
In the dialog box, check the box if it is unchecked which says “After Pressing Enter, move selection” and select your desired direction to move.

Changing the number of recent files to show
If you are working with a large pool of files you may switch documents here and there.
One thing you can do for faster switching between the different excel documents is to include more lists of files in the recent files. This way you can choose from a large file set and switch faster to get along with your work.
Under the “Show this number of Recent Workbooks”, choose the number of files you want to display in the recent window.
Changing the Ruler Units
There are three ruler units to choose from. They are inches, centimeters and millimeters. Select the option which you are the most comfortable with.
Changing the Start-Up workbook of MS-Excel
This is one of the advanced and useful tools to change the starting workbook of MS-Excel.
If you want to open a specific Excel file in which you work the most after starting up the MS-Excel Software you can do so by including your excel file to the XLSTART Directory.
The file needs to be saved or moved to your XLSTART directory which is on your local C: drive. The location of this directory varies depending on your version of Windows and Microsoft Office; search your hard drive for the folder. On most systems, the location is:
C:\Users\<username>\AppData\Roaming\Microsoft\Excel\XLSTART, where <username> is your Windows login name.
To view the location of the XLSTART directory:
- Click on File tab in Excel Home Screen.
- Click on Options
- Go to the Trust center
- Under Microsoft Excel Trust Center -> Click on Trust Center Settings
- Then click on Trusted Locations

You will find something like this from which you can locate to the XLSTART directory and paste your working folder to the directory to start the file on every Start up.
If you are not able to find the folder, make sure you have enabled – show hidden files in your system.
Formula Settings
You may have some ideas on how to incorporate excel formulas in Excel sheet. Here are some of the formula settings which can get you started towards efficient computations.
Let us see some basic formulas and how to set the settings for the Formulas.
Overview of formulas in Excel
Get started on how to create formulas and use built-in functions to perform calculations and solve problems.
Important: The calculated results of formulas and some Excel worksheet functions may differ slightly between a Windows PC using x86 or x86-64 architecture and a Windows RT PC using ARM architecture.
Create a formula that refers to values in other cells
- Select a cell.
- Type the equal sign =.
Note: Formulas in Excel always begin with the equal sign.
- Select a cell or type its address in the selected cell.

- Enter an operator. For example, – for subtraction.
- Select the next cell, or type its address in the selected cell.

- Press Enter. The result of the calculation appears in the cell with the formula.
See a formula
- When a formula is entered into a cell, it also appears in the Formula bar.

- To see a formula, select a cell, and it will appear in the formula bar.

Enter a formula that contains a built-in function
- Select an empty cell.
- Type an equal sign = and then type a function. For example, =SUM for getting the total sales.
- Type an opening parenthesis (.
- Select the range of cells, and then type a closing parenthesis).

- Press Enter to get the result.
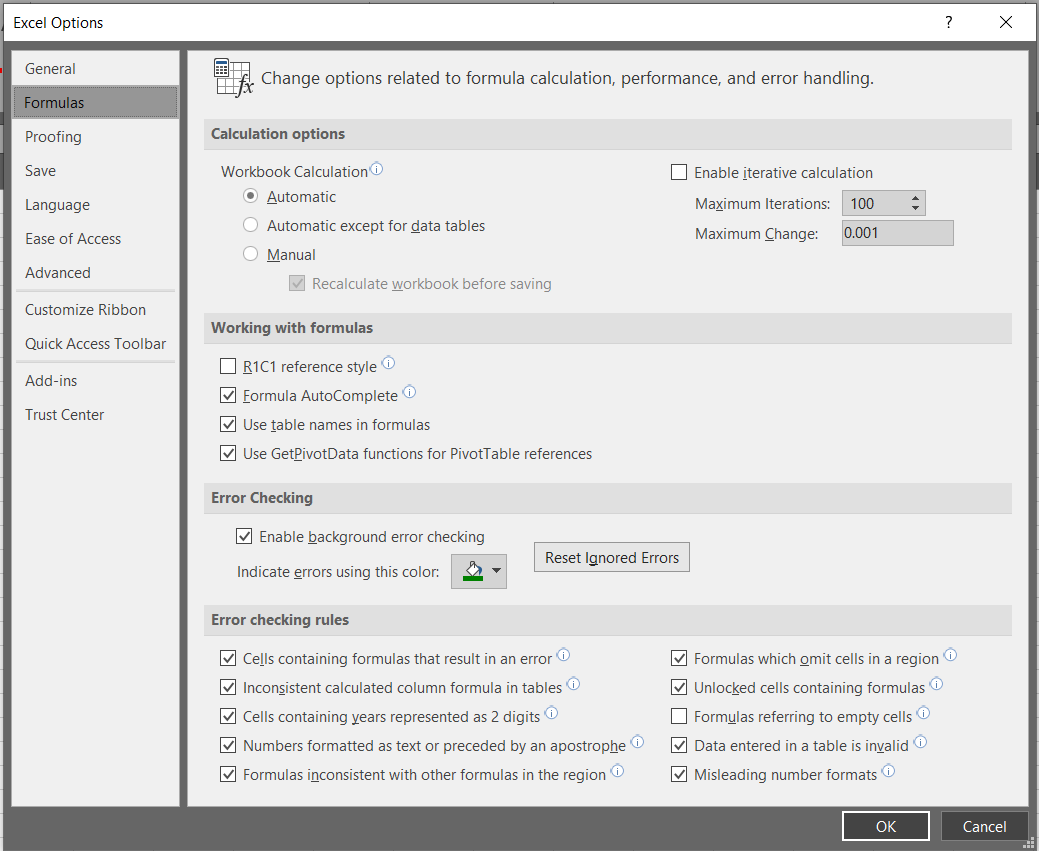
Calculate Options Section
- Automatic – (Application Setting) Calculates all dependent formulas every time you make a change to a value, formula or name. Any workbook that contains formulas will be automatically calculated when it is opened. This is the default calculation setting.
- Automatic except tables – Calculates all dependent formulas except those in data tables. Data tables will only be recalculated when one of its values are changed. You can calculate the formulas in data tables by pressing the “Calc Now” button.
- Manual – Calculates the formulas only when it is requested by the user to do so.
- Re-calculate before save – Re-Calculates all dependent formulas in the worksheet before it is saved.
- Enable iteration calculation – This can be used to restrict the iteration when using circular references.
- Maximum iterations – Set the maximum number of iterations before the iteration stops. Default maximum iteration value is 100.
- Maximum change – The largest number that the change in value, must be less than, before which the iteration must stop. The smaller the number the more accurate the result is. The default value is 0.001.

Working with formulas
The R1C1 reference style
You can also use a reference style where both the rows and the columns on the worksheet are numbered. The R1C1 reference style is useful for computing row and column positions in macros. In the R1C1 style, Excel indicates the location of a cell with an “R” followed by a row number and a “C” followed by a column number.
| Reference | Meaning |
|---|---|
| R[-2]C | A relative reference to the cell two rows up and in the same column |
| R[2]C[2] | A relative reference to the cell two rows down and two columns to the right |
| R2C2 | An absolute reference to the cell in the second row and in the second column |
| R[-1] | A relative reference to the entire row above the active cell |
| R | An absolute reference to the current row |
When you record a macro, Excel records some commands by using the R1C1 reference style. For example, if you record a command, such as clicking the AutoSum button to insert a formula that adds a range of cells, Excel records the formula by using R1C1 style, not A1 style, references.
Formula Auto-Complete
Selected by default, this option lets you use Formula AutoComplete to easily create and edit formulas and to minimize typing and syntax errors. When you type an = (equal sign) to start a formula, followed by the beginning letters or a display trigger, Formula AutoComplete provides a dynamic drop-down list of valid functions, names, and text strings that match the letters or trigger so that you can simply insert an item in the drop-down list into the formula. Clear the Formula AutoComplete check box if you don’t want to use Formula AutoComplete.
Use table names in formulas
Selected by default, this option makes it easier and more intuitive to work with table data when you use formulas that reference a table, either portions of a table or the entire table. Clear the Use table names in formulas check box if you don’t want to use table names in formulas.
Use GetPivotTable functions for PivotTable references
Determines the type of cell reference that is created for a PivotTable cell when you use semi-selection in a formula outside of the PivotTable. Select the check box to create a GETPIVOTDATA function cell reference, such as GETPIVOTDATA(“Sales”,$A$5). Clear the check box to create an A1 reference style cell reference, such as A5.
Error Checking

This section gives you control on some of the error handling settings.
- If the Enable background error checking option is checked, Excel checks cells when it is idle. If a cell is found to have an error, the cell is flagged with an indicator in the upper left corner of the cell.
- You can also set the colour for excel to highlight or indicate the errors. By clicking on the colour bucket icon parallel to the Indicate errors using this colour option. The default colour is set to green.
- You can use the Error Checking dialog box or the Error Checking Smart Tag to ignore individual errors that might have been flagged. The Reset Ignored Errors button allows you to reset all the errors in all the worksheets in the active workbook. You will be able to see all the formula errors If the ignored errors are reset,.
We hope this article has provided you enough information to get started to make the workbook your own personal working area customized according to your work needs.
Sources:
1. https://support.office.com/en-us/article/overview-of-formulas-in-excel-ecfdc708-9162-49e8-b993-c311f47ca173

Class-room of your choice
Upskill yourself by attending classroom or online class.

Flexible timings
Learn at your convenient time. We have a flexible schedule, which is designed to suit your learning style and pace.

Class-Room Size
With limited students in class, attention to each student's performance will be given.

Industry Ready Curriculum
The course is designed for people who want to work in the industry.